Tuesday 10 December 2013

'SUBTLE METAL PUNK' MAKE UP

I have been loving dark eyes and dark lips, and have been sporting this look for house parties and events. Due to my dark hair - with bright blue tips - and pale skin, I've wanted to try dark colours for a while but always scared from it. Too much dark eye make up could make me look tired and washed out, so I had many tries at finding something that worked for me. The upcoming photos are very bold, but of course, like all tutorials, this is just inspiration. Feel free to adapt or just appreciate.
For my 'punk' look I focused on the lips, keeping them as dark as I could. First I applied MUA's Velvet Lips in Kooky from their Luxe range, which I LOVE. The lip colour is amazing and dries perfectly matte, and staying all day! A review on this to follow shortly. 
Then I went over my lip line to create more of a lip with my Maybelline Color Tattoo in Timeless black, a review also to follow. I ombred the colours together with a lip brush so the MUA colour was in the middle, making my lips appear fuller. The main reason I did this though was to add extra dimension to my look. Of course, you can just stick with Kooky.


I kept the eyes simple using Barry M's Dazzle dust in 89 - A shimmery grey with gorgeous purple flecks. On the bottom I used another Barry M Dazzle Dust in a purple shade, which is unfortunately now discontinued. On the waterline I used Urban Decay's 24 Hour Eyeliner in Rockstar. I then combed my lashes with the 2True Colour Mascara in Brown, to give my eyebrows thickness. I usually shadow in my eyebrows pretty dark, but I wanted to keep the focus on the eyes and lips. Finished with a bit of mascara. 
For my skin, I first applied Murad Hybrid Primer which I love, to even out my skin and camouflage my large pores. I then used L'Oreals True Match foundation. I wanted to keep the skin as matte as possible, but with defined contouring. I contoured my cheeks with the matte brown shade from the Sleek Face Form palette. I used no highlighting for this look.

So there we go, my take on a dark and daring make up look.
What do you think of the finished look?
Are you daring enough?
I dare you to swap your everyday lippy for a slightly darker one 
on your next night out!


Thursday 28 November 2013

1950'S HAIR LOOK FROM NEAL AND WOLF

I've tried and loved Neal & Wolf, and when they asked me to style my hair into a 1950's inspired look, I couldn't say no. Continuously doing performances, mainly jazz, it would be ideal for me to have a wavy, sexy hair do. Read on to find out how I achieved a gorgeous hair look using the amazing Neal & Wolf products on my long hair!
I have very long hair, so I was a bit unsure with how it was going to turn out. But first of all I applied ELEVATE Volumising Lotion - Which I love - to wet hair, and dried with a dryer tipping my head upside down. This gave me crazy volume, and made a huge difference on my outcome. I then used the GUARD Heat Protect Spray all over. This smells gorgeous, and protects up to 220 degrees! Yay! Once my hair was dried, I used a curling wand as above and pulled the curls out still in their ring, and clipped them into my hair. I used this method a few times, and I can say that I love the outcome, and Neal & Wolf really enhances the outcome.

Excuse the no make up. I decided to keep my hair in it's up-do form during tech runs and do my hair and make up an hour before the show. I sprayed FIX Hold and Shine Spray over the curls so I can be sure that the curls will come out beautifully. I left this in for around 2-3 hours, and everyone was saying how cute I looked and how they wanted to see what it looked like when it came out. When I pulled the bobby pins out that kept them in place, I used a wide comb brush and my fingers to soften the curls.
So above we have pictures of me all ready for performing! The outcome looked beautiful, and my hair looked healthy and gorgeous. The curls stayed in beautifully, and everyone was saying how amazing my hair looked on stage, and I have Neal & Wolf to thank for! My hair was shiny and sexy, and didn't let me down. The look was perfect for my jazz night, and I can't wait to use these products more!

Grab these goodies from Neal & Wolf ready for the Christmas season!
Prices of the products I used range from £11.50* to £12.50*.
What do you think of the hair?


Friday 8 November 2013

ORLY RIGHT AMOUNT OF EVIL REVIEW AND SWATCH

I love me some glitter, and I am indeed a glitter varnish hoarder - I don't know when to stop! When I see a gorgeous glitter I need to have it. This Orly shade in Right Amount Of Evil just screams fall. With it's pretty dark orange base and holo glitter, this is indeed my autumn glitter shade.
This pretty top coat has a orange shimmer and tint to the base of the varnish, so this wont go on top of just any shade. I suggest using a brown, yellow, orange, black or white - which I've used here - with this top coat, or else it could get weird...
I have fallen for this gorgeous orange shimmer, and I will be wearing it a lot through autumn. Inside the pretty shimmer are medium sized silver hex holo glitter - That's a mouth full - with teeny little specs of glitter and tiny straight glitter too, all of which is silver. I love how the hex glitter catches the light and shines like a rainbow, and the smaller glitter and shimmer in the varnish really gives my nails a punch.
It's a dream to apply, and has minimal streaking. In this photos I applied 2 coats with a white base, but you can also layer this baby up, but does take time. It's quick drying and the glitter doesn't catch at all. I hate a glitter that catches on my clothes. Overall I am in love, and I have become slightly obsessed with Orly polishes right now, so expect a few more Orly posts in the near future...
What do you think of this top coat?
Too busy for you?
What's your autumn varnish shade?
Grab Orly Right Amount Of Evil for £10.75 at BeautyBay.


Thursday 7 November 2013

SEEING DOUBLE? - SINFULCOLORS HOTTIE VS OPI LAST FRIDAY NIGHT

Last Friday Night by OPI from the Katy Perry collection is one of my favourite shades in my OPI collection and I'm always using it on top of dark colours. After a browse in Boots recently I spotted a new SinfulColors stand, and at just under £2 each I had to have a look! Instantly I was drawn to Hottie, a pretty blue with iridescent glitter throughout. The reason I was drawn to it was because it looked identical to Last Friday Night, so when I got home I put them to the test.
At first glance these look uncanny, but with careful observation you notice small differences. Last Friday Night has more larger glitter, while the SinfulColors shade has more smaller silver particles. Also the consistency is slightly different, Hottie being more thicker, but both have fast drying time and wear. 
I first applied two coasts of OPI's Lincoln Park After Dark as a base.
 L-R in above photo - Index finger is Hottie, then Last Friday Night, then Hottie and then Last Friday Night
on the pinky.
As you can see, when applied Hottie does have more smaller particles in comparison to Last Friday Night. OPI's glittery shade has more of a sparse covering of the nail and is nice for a subtle shimmer. Overall, I love them both, but I have found myself reaching for more of Hottie for my evenings out as it gives my nails more sparkle. And plus, these glitters are perfect for a galaxy nail effect!
Which one do you prefer?
Have you tried SinfulColors before?
Get your SinfulColour fix for £1.99 each from Boots,
and currently 3 for 2 as well!


Tuesday 5 November 2013

OCC LIP TAR IN NYLON - REVIEW AND SWATCH

For years I was so eager to try out one of Obsessive Compulsive Cosmetics world famous Lip Tars. After a lovely trip to meet the lovely Marvelle at BlogOfShadows I picked up a few Lip Tars which over the past few months I have just fallen in love with. In the next week I have 3 more Lip Tars to show you, and I cannot wait to get more.
Lip Tars are liquid lipsticks that come in a cute tube with a small nozzle, perfect for applying directly to the lip brush, or into pots to mix up your own colours. I've tried mixing colours up but have been pretty limited with 4 colours, but I recently bought a green shade, so things could get interesting!
I tend to use a brush to apply the lipstick accurately, but on occasion I use my finger to add a subtle hint of colour when I'm in a rush. 
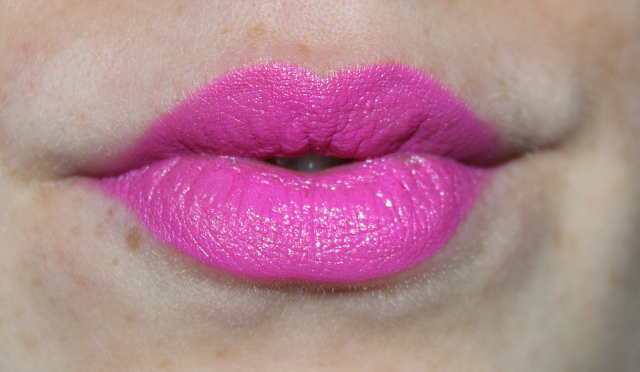
I am a Lip Tar convert, and I cannot be without one in my bag. The lipstick dries to a semi matte/satin finish. The more you apply, the glossier it is. You literally need the tiniest drop of this bright pink to create an opaque finish. I am in LOVE with Nylon, and is usually compared to OCC's Anime and MAC's Candy Yum Yum. The wear on this lipstick is also brilliant and lasts throughout the day with little touch ups - I can even eat and drink with it staying put!
I have now come to the conclusion that I need more OCC Lip Tars in my life. Usually the one for the Mac lipsticks (I have 25...) I am slowly coming over to the Lip Tar ways. With so many finishes and colours to choose from, you can definitely find one that you love, or mix up your own colours!
Grab a OCC Lip Tar from Selfridges and see what the fuss is all about.
These babies cost £11.50, but worth every penny.
Have you tried Lip Tars?
What do you think of them?


Tuesday 13 August 2013

BEAUTY HAUL - FIRST YOUTUBE VIDEO


So I've dabbled in Youtube videos finally! This is my first video, and it's a video on a few make up and skincare pieces I picked up in London and Norwich. Let me know what you think. Each view and sub means so so much. Hope you enjoy!

Hannah
xxx

Sunday 11 August 2013

SIMPLE JENNIFER LAWRENCE RED CARPET MAKEUP LOOK AND TUTORIAL

Jennifer Lawrence is one of my girl crushes, so I felt the need to do a make up look inspired by her. Because of my face shape, eye shape, eye colour etc, I wont be able to look exactly like her - But boy will I try! I shy away from any style of smokey eyes as I feel is makes me eyes appear a lot smaller than they already are. The make up look I did is a little more subtle than Jennifer's, but you can intense it for a more bold look - Which I don't think I could pull off! I kept my products to a minimum so this look could be achieved by any level of make up skill.

Let's get started!

Hello world. This is me with no make up. First of all, our Jen has beautiful radiant skin and has a lovely natural dewiness to it. Because of this I will just cover up any imperfections with Maybelline Fit Me concealer in shade 15. I will leave any finishing powder until the end.

For the eyes I used the Urban Decay 15th Anniversary Palette. I used the shade M.I.A. up to the crease. As you can see from the picture above, I have very small eyelids so I didn't need much of this. I used the Calvin Klein Shadow Brush to apply the shadow. I also used MUA Eyeshadow Primer - but this is optional.
From the same palette I then used Deeper to blend out the M.I.A. shade. The shadow comes out to the outer corner of the eye and then over the socket to meet the inner corner of the eye. I used the Real Techniques Deluxe Crease Brush to blend out the shadow. Then using the Real Techniques Brow Brush I carried on the shadow under the eye and up to the inner corner. Then using Max Factor's Kohl Pencil in Black I lined my bottom and upper line. When applying the pencil to the bottom, make sure you go into the tear duct and blend out it out a bit with some of the product left on the brow brush. I then used the pencil on my lid and up to the crease and blended it out with the same crease brush. If you have a larger lid, don't take the eyeliner up that high.
Her lashes are pretty natural, so I just used MUA Mega Volume Mascara to create natural lashes. I have rather long bottom lashes, but as you can see, Jen doesn't.
She wears a natural colour on the lips. I opted for MyFace Cosmetics lipstick in Vintage Pink as it's the perfect nude for my skin tone.
For the cheeks I used Sleek's Face Form Palette in Medium, and used the highlighter and bronzer mixed together and blushed over the apples of my cheeks, and up to my brows. For the brows I used Illamasqua's Eyeshadow in Boomerang with Ecotools Brow Brush to gently add some colour. Her brows aren't overly defined. I then finished off with Mac's Pearlmatte Face Powder in In For A Treat all over the face to set the concealer and add some subtle shimmer, and then added Illamasqua's Eyeshadow in Moonflower to add some dewiness to the nose, forehead, cheeks and chin.
So there it is!
Let me know if you will try this look, 
and let me know what you think!


MAC PIGMENT IN MAGIC SPELLS FROM THE ARCHIE'S GIRLS COLLECTION REVIEW AND SWATCH.

I recently opened this bad boy. This is Magic Spells from the Archie's Girls Mac collection that came out around February 2013. You can still grab a few pieces of the Archie's Girls collection online from Debenhams, House of Fraser and Selfridges - But only selected items. Even though I have left it late to review this, I felt the need to show the world the pretty colour that sits in this gorgeous little pot. If you ever come across it in a blog sale or online, be sure to pick this up!
The soft, fine dust is cased in this pretty little pot, with a white lid and Veronica's face on the front. Magic Spells is a very appropriate name for this mystical colour. The colour of the pigment is a deep black with slight hints of teal. The base itself is matte, and the beautiful teal, green and navy shimmer gives it something special. Reminding me of petrol in the water, this pretty shade couldn't go a miss when I saw it. It's perfect for making a smokey eye a little different. The amazing pigmentation means you can use this on it's own, but its ability to also add a sheer darkened colour to the lids is exciting, enabling me to really play with this product. If you want something similar to this, Barry M's Petrol Black is very similar, but has a more purple shimmer to it, which I will review very soon. This stays put too, but I team it with a Paint Pot from Mac, or my Urban Decay Primer Potion. You can also use this wet which intensifies the colour and makes it even more opaque. 
What do you think of this magical shade?
Grab it from online outlets, but be careful of fakes.
What did you pick up from the Archie's Girls collection?


Saturday 3 August 2013

AVOBATH LUSH BATH BOMB REVIEW

I am a huge Lushie, so I try and get my hands on as much Lush as I can. This little ball of goodness caught my eye. Have a bath with Avobath - A green ball of olive oil, lemongrass and avocado.
This bath bomb smells really subtle. I know some people don't like lush because of it leaving residue or its strong scent, but this scent is so fresh and not at all artificial. You can really smell the delicate scent of avocado and the subtle kick of lemon, which is really lovely. If you're not a fan of lush products because of its over powering smells, you could surprise yourself and like this little one. 
Once dropped into the water, it turns your bath a Shrek-green! It doesn't look overly pleasant, but fun nevertheless. It doesn't take too long to dissolve into the warm water, and fizzes away until the water turns completely green. In the shop I was told this is one of the most hydrating bath bombs.. And was that true?
Yes. Once out of the bath not only did I smell fresh, I felt good. My skin felt really soft and smooth and I could not help but feel my soft legs! This wasn't drying at all on my skin, and everything about this bath bomb felt natural and good. This bath bomb would've been one of the last ones for me to try, naturally going for the pretty ones or the ones that smell like my whole perfume shelf, so I was so surprised with how much I loved this. 

Grab this from Lush for a reasonable £3.20.
Get beautifully soft skin with this ball of wonder!


Friday 2 August 2013

MAC POWDER BLUSH IN ROYAL SUNSET FROM THE ALL ABOUT ORANGE COLLECTION SWATCHES AND REVIEW

I felt the need to treat myself to a blush, and true to my fashion I went straight to Mac. Only owning one blush from them before, I had all the colours to choose from. This pretty muted coral-pink caught my eye immediately. Again, this is a limited edition colour, so grab if your Mac store has any left in stock. Also this will probably appear again in the future, and is available on other outlets online - but beware of fakes.
Royal Sunset is a perfect name. When I think of sunsets I think of gorgeous coral and pink hues - And this is exactly what this little pot of blush is. I utterly adore this, and it's been going around with me everywhere.
I'm usually the one to pop a wash of pink on to my cheeks, so it was nice to get a blush with a coral kick to it. It gives a lovely glow to my skin, and is easily buildable. It looks lovely on my pale complexion, and I believe it would on tanned tones too. I can't work out if this would look ashy on dark skin tones, so this is one to try before you buy. Once I've blushed this pastel hue over my cheeks it doesn't budge for hours. Doing split shifts as a waitress means I don't have time to redo my makeup, and this stays put from 12 noon to 11pm. An absolute winner from Mac. As you can see from the swatch below, it's a very light pastely pink, and swatches more pink that the coral it looks in the pan.
I am in love with this beauty. 
You can grab this for £18 from your nearest Mac store if they still stock it,
or online. 
What's your favourite Mac blush?